Apply Textures#
Tired of clicking Ctrl + Shift + T?
Transmogrifier adds Principled shader setups for you!
Transmogrifier can detect the presence of multiple image texture sets and non-destructively modify them during the conversion process.

Source#
Transmogrifier can source textures in 3 different ways.
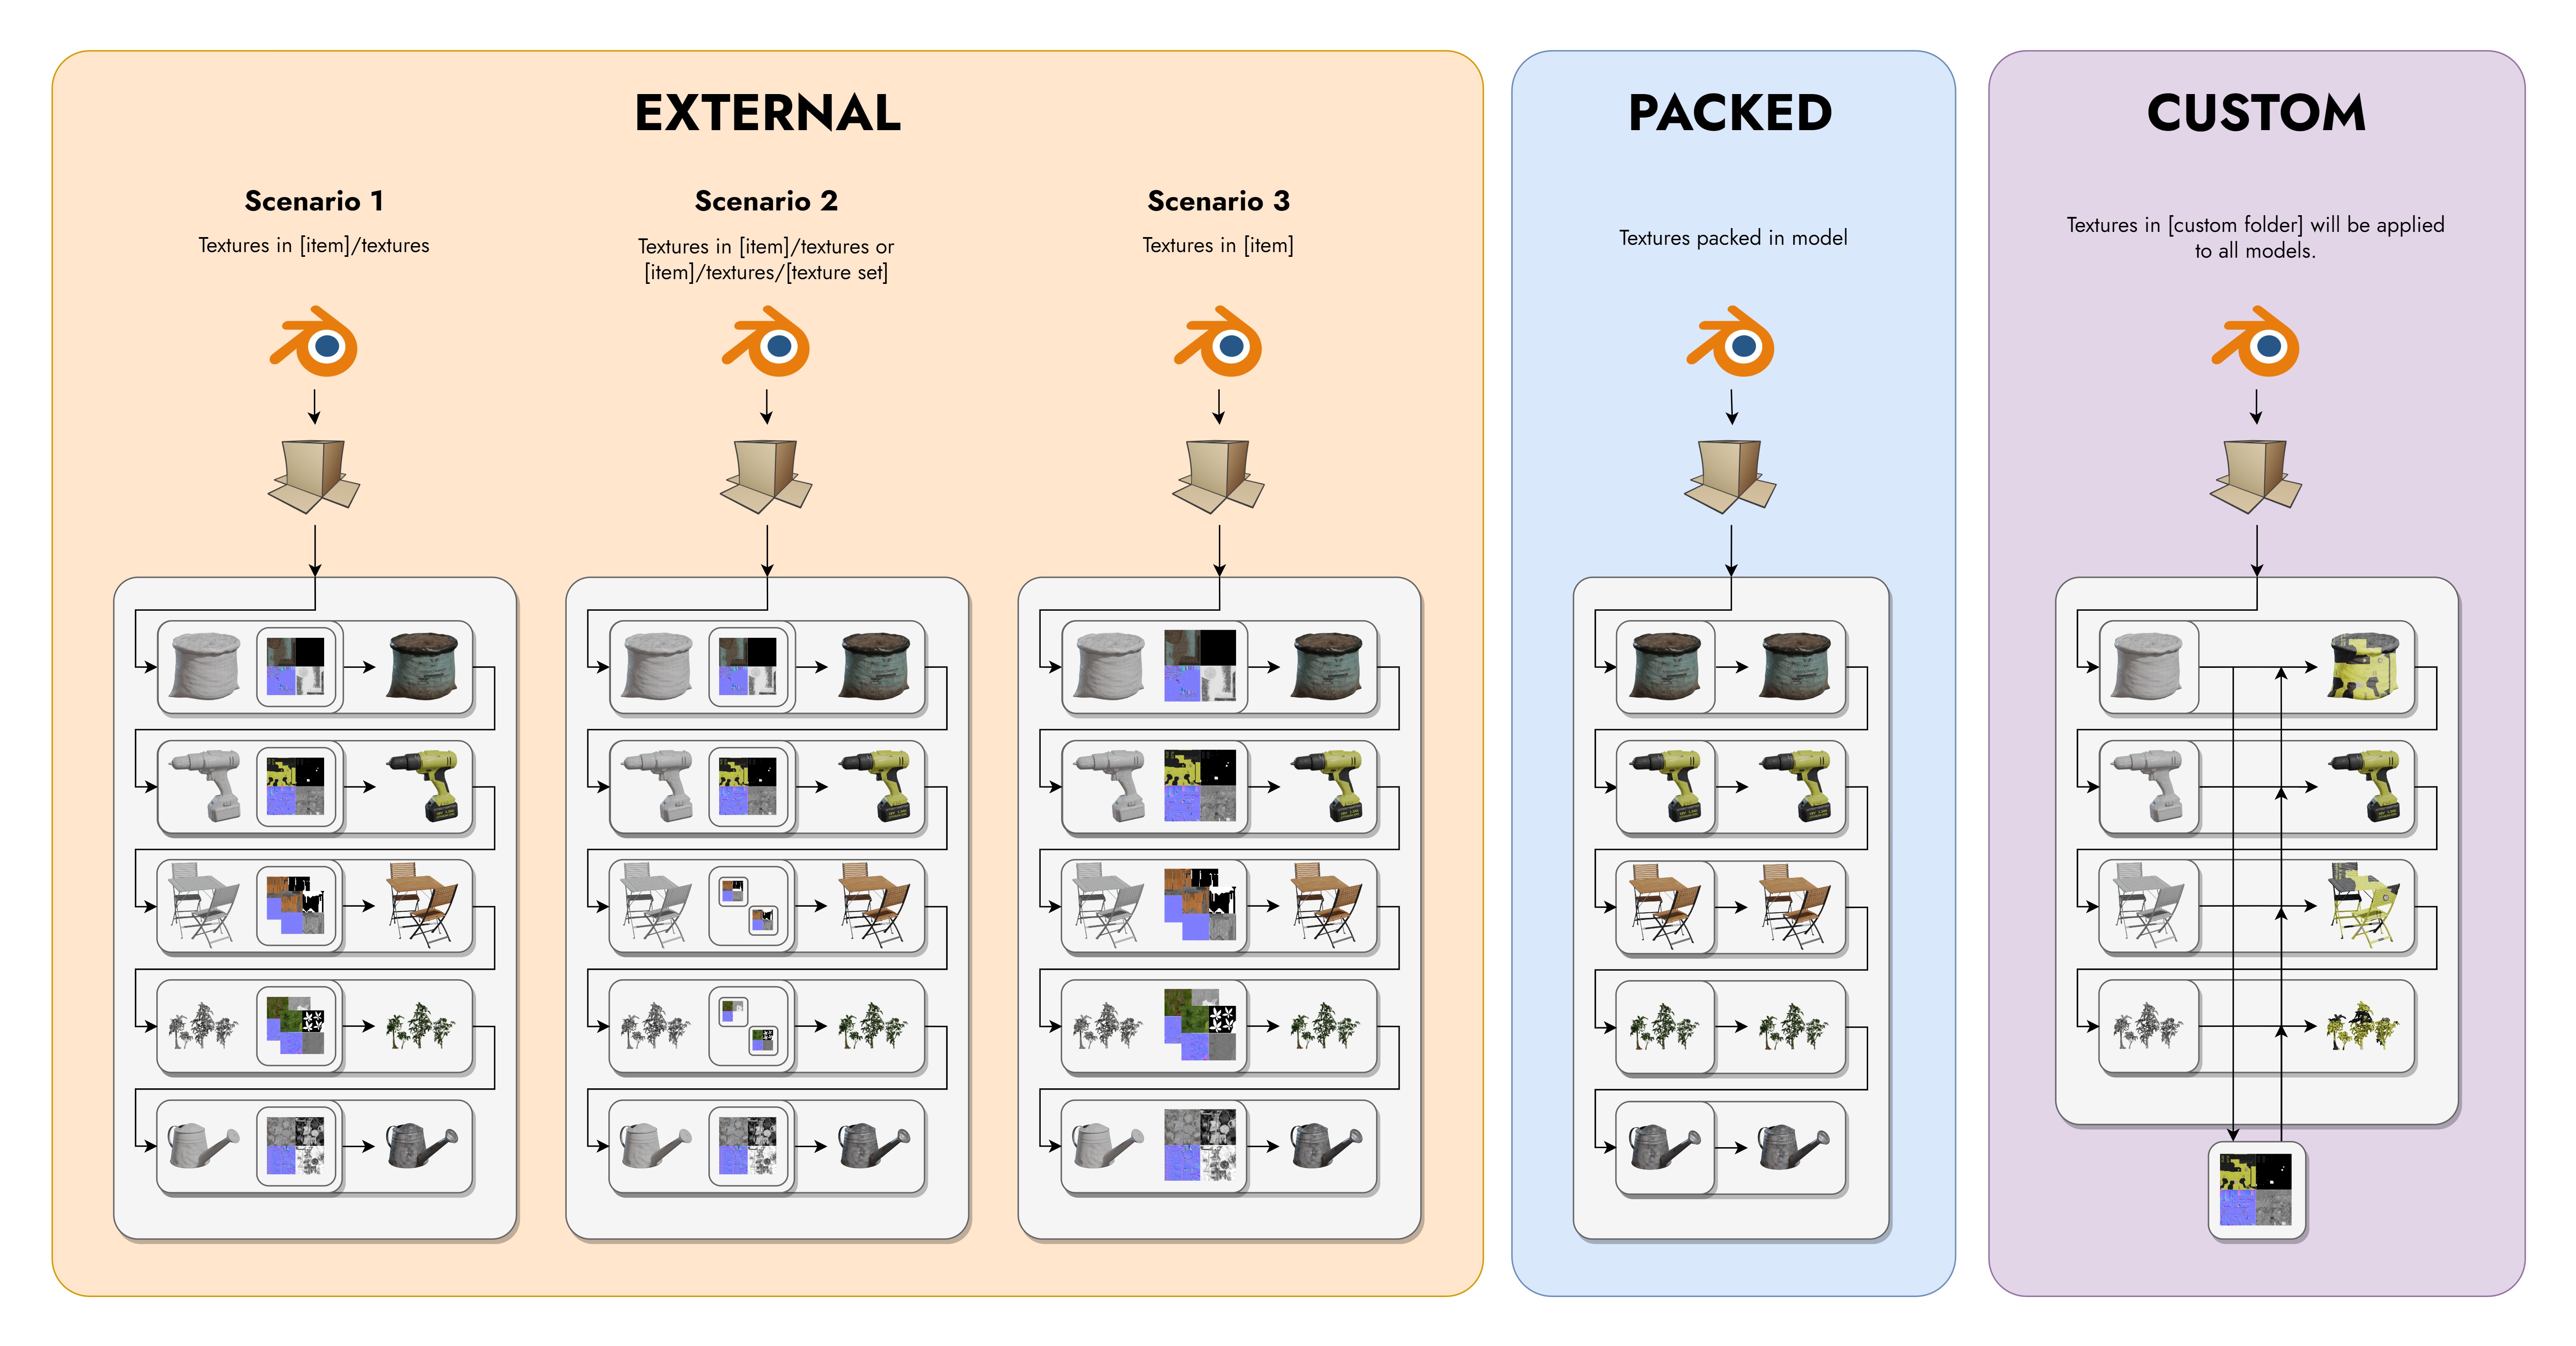 Models from Polyhaven (CC0). Each gray box with rounded corners indicates a directory/folder. The scenarios shown in the diagram above depend on whether the selected import or export formats support textures.
External#
External tells Transmogrifier to look for image textures adjacent to the imported model.
Example
An example of this scenario would be converting FBX files with textures into GLB files.
Textures can exist adjacent to the imported model in the following ways.
Texture Sets in textures Subdirectory |
Texture Sets in textures Subdirectory > Subdirectories |
Texture Sets Adjacent to Import File |
|---|---|---|
textures |
textures > [Texture Set 1], [Texture Set 2], etc. |
Import File Directory |
| in a "textures" subfolder relative to the import file | in "[texture set]" subfolders inside a "textures" subfolder relative to the import file | in the same directory as the import file |
 |
 |
 |
| ✅ Best Practice, follows modern conventions | 🟢 Good Practice, ultra-organized | 🟡 Questionable Practice, disorganized |
Packed#
Packed tells Transmogrifier to use any image textures packed into the imported file for conversion
Example
An example of this scenario would be converting GLB files to USDZ files.
Custom#
Custom tells Transmogrifier to use image textures from a single directory and apply them to all models converted.
Example
An example of this scenario would be converting many separate OBJ files that all use the same textures into USDZ files.
Tip
Transmogrifier looks for textures inside a Custom directory in the same manner it does for External textures.
3 Texturing Rules#
There are three naming conventions that must be followed in order for textures to be properly imported, materials created, and materials assigned to the right objects.
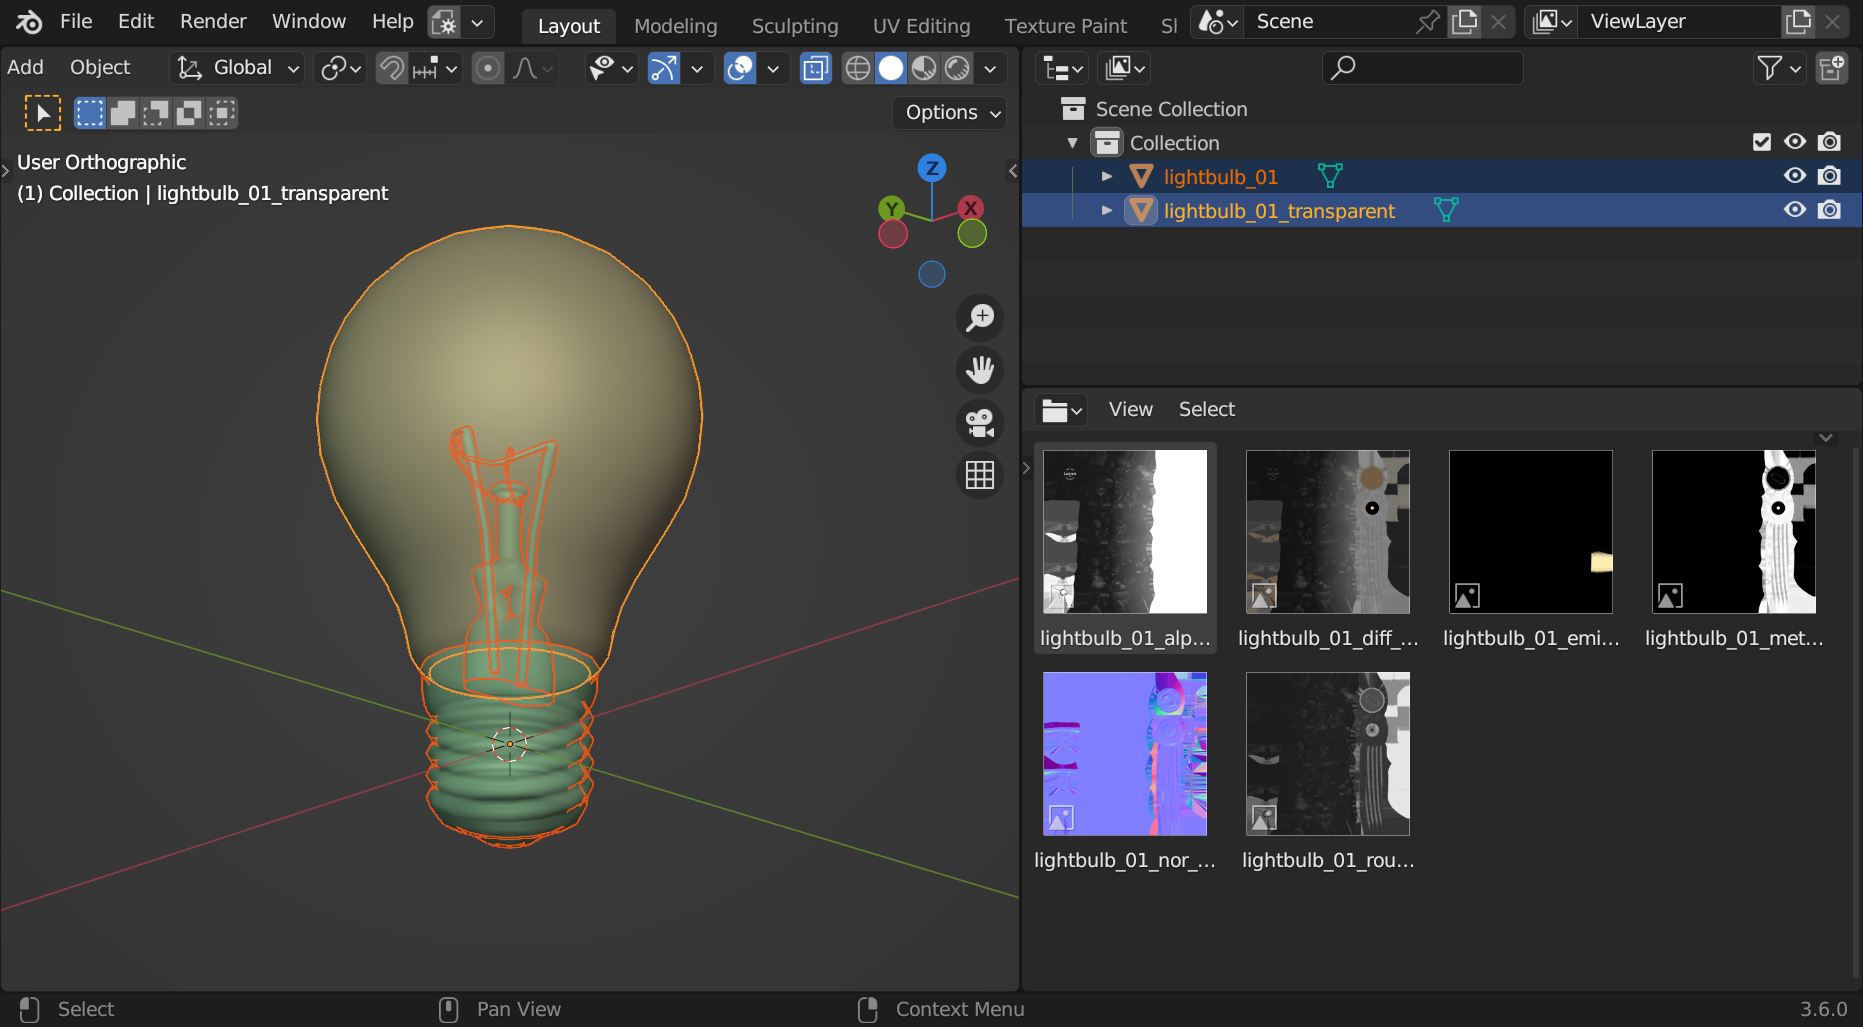
Rule 1: Transparency#
Transparent objects must have the word transparent in their names and exist as separate objects from opaque objects.
Objects that should appear transparent must have the word "transparent" present somewhere in their names. This tells Transmogrifier that it should perform the following steps:
- Duplicate the material as "[material]_transparent"
- Turn on "Alpha Blend" blending mode
- Assign "[material]" to the opaque objects
- Assign "[material]_transparent" to the objects with the word
transparentin their names.
Info
This convention works for multiple texture sets as well.
Example: Rule 1
 |
 |
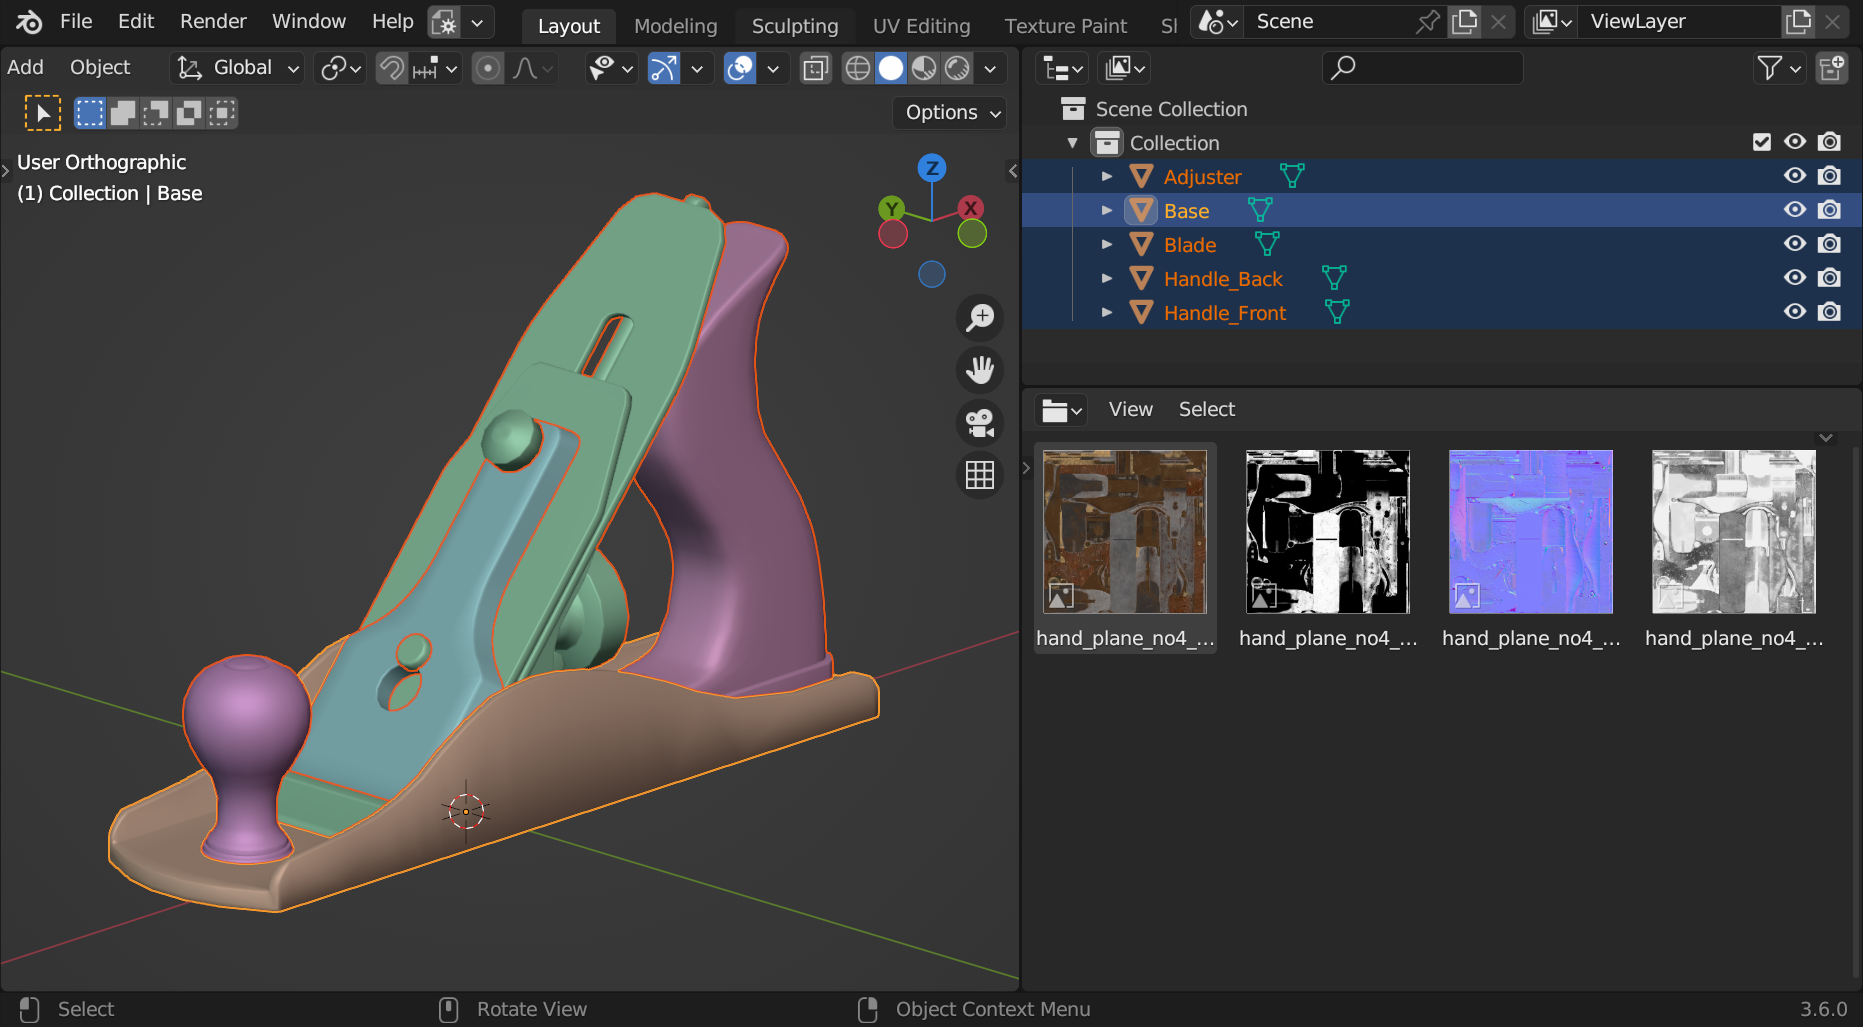
Rule 2: Single Texture Sets#
Per import file, if only 1 texture set is present, object names don't matter except for Rule 1.
For External and Custom texture sources and for models with only one texture set present, Rule 1 doesn't matter because it is assumed that single texture set should be applied to all the objects in the scene.
Example: Rule 2
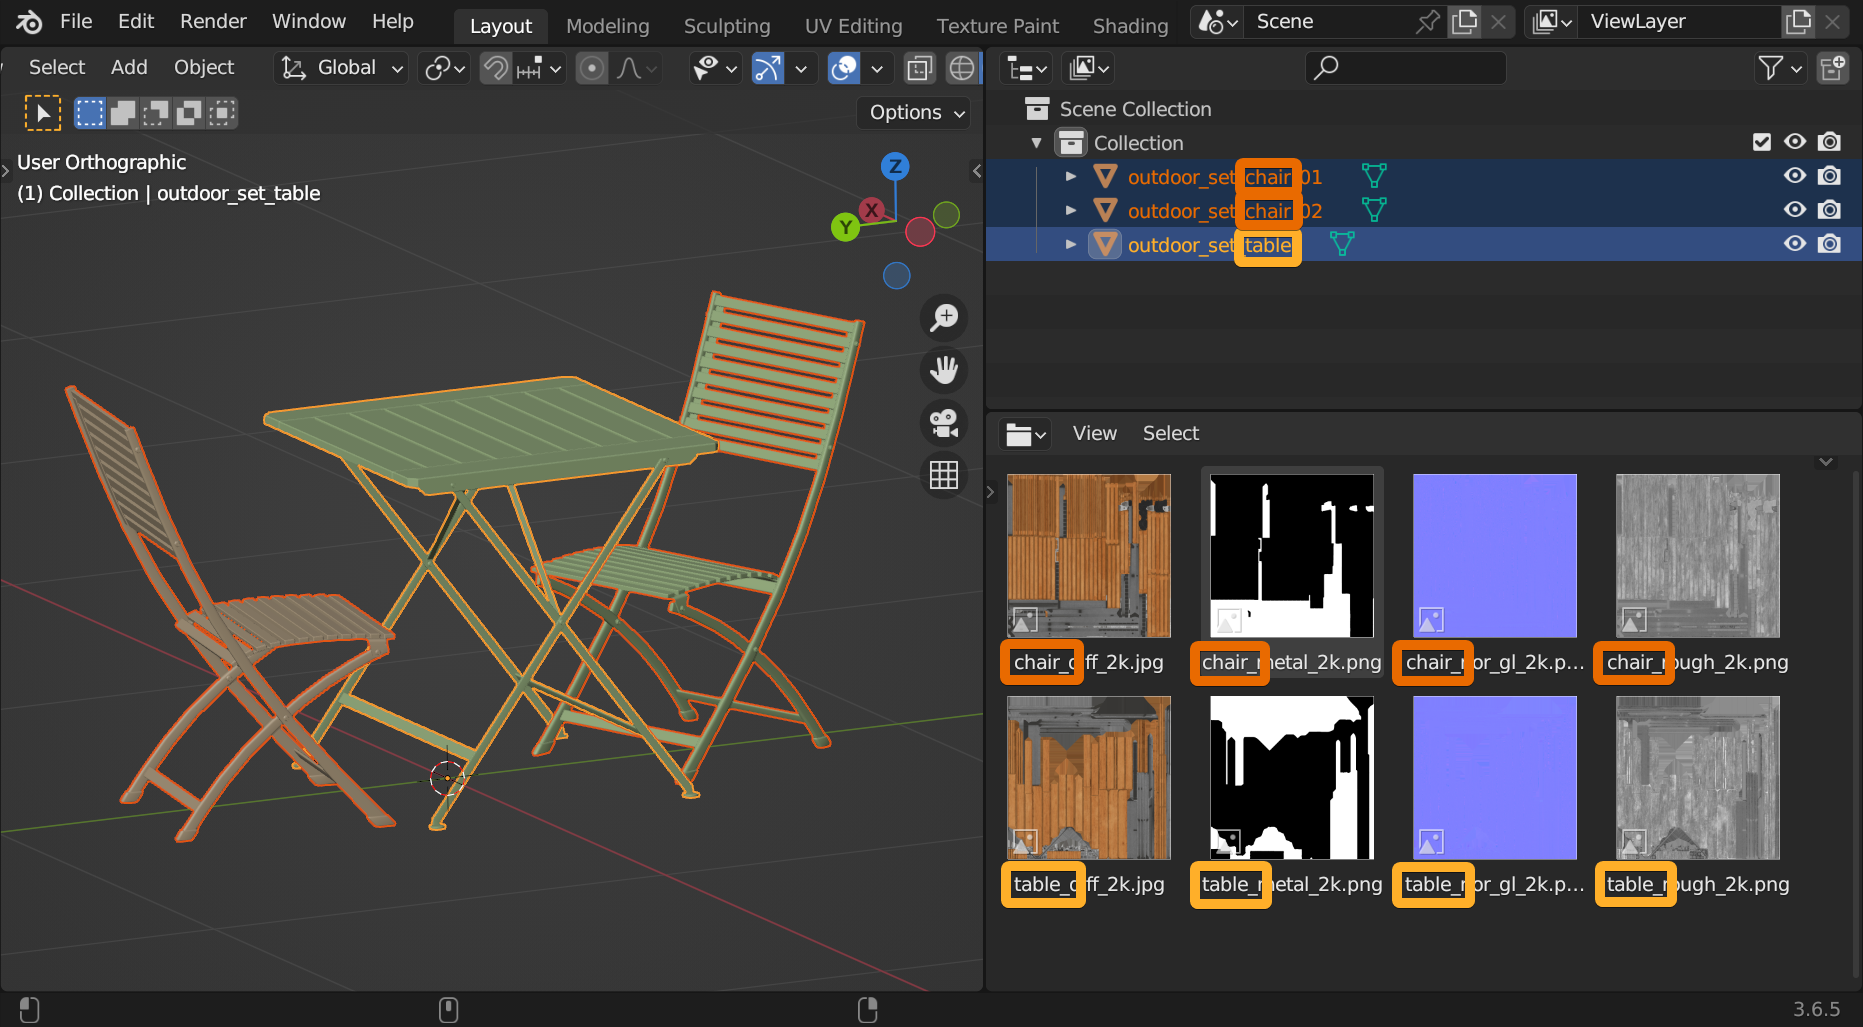
Rule 3: Multiple Texture Sets#
Per import file, objects' names must include their corresponding texture sets' names if >1 texture set is present and textures Source is either External or Custom.
This Rule does not apply to Packed textures scenarios.
For Packed textures source, Transmogrifier automatically keeps associated materials, textures, and objects synchronized.
For models with more than one texture set present, a texture set naming convention must also be followed for Transmogrifier to correctly import and assign multiple texture sets to the proper objects.
Simply ensure that each texture sets' names are
- distinct between texture sets and
-
consistent between
- each PBR image in each texture set and
-
texture sets and the corresponding objects to which those textures should be applied (See image below).
Warning
As such, having multiple materials assigned as distinct slots to different meshes within one object is not possible.
Example: Rule 3
Edit Textures#
Edit images textures non-destructively & on-the-fly. For every item converted, Transmogrifier copies textures to a temporary directory and performs modifications to the copies only. Original image textures are always preserved, unedited, at their full resolution.
Click + Add Texture Edit to add a texture edit profile. Click ✖ to remove a profile.
Edit Textures Presets#
Create custom Edit Textures presets for quickly switching between different image editing scenarios. (1)
Edit Texturespresets are stored asJSONfiles in your Blender preferences directory.
Click the plus button + to create a preset from the current Edit Textures settings and profiles, giving it a custom name. Click OK to save it.
Select an existing preset from the menu.
Remove a workflow by selecting it from the menu, then clicking the minus button -.
To edit an Edit Textures preset,
- Select your preset.
- Make your adjustments to settings.
- Click the minus button
-to remove the preset. - Click the plus button
+and give the new preset the same name. ClickOK.
Note
This is more inconvenient than some kind of "save" button, but it keeps Transmogrifier's conventions more consistent with Blender because Blender approaches user presets in this manner.

Resize Textures#
Resize images textures non-destructively & on-the-fly.
- Images will not be upscaled.
Supported Resolutions
8192409620481024512256128

Reformat Textures#
Reformat textures non-destructively & on-the-fly.
Supported Image Formats
PNGJPEG(.jpg)TARGATIFFWEBPBMPOPEN_EXR

Regex Textures#
Use regular expressions (aka regex) to correct misspellings and inconsistencies in image texture PBR tags. This helps to guarantee their detection and import by Transmogrifier.
Example
| Original Name | Regexed Name | Reason for Regex |
|---|---|---|
| lightbulb_01_diff_2k.jpg | lightbulb_01_BaseColor_2k.jpg | Normalize |
| lightbulb_01_mtal_2k.png | lightbulb_01_Metallic_2k.png | Misspelling |
| lightbulb_01_transprancy_2k.png | lightbulb_01_Alpha_2k.png | Misspelling |
| Monkey Base Color.webp | Monkey_BaseColor.webp | Normalize |
Node Wrangler
Transmogrifier relies on Node Wrangler's Add Principled Setup feature to detect image textures, import textures, and create a material shading network.
Edit PBR Tags#
You can modify the PBR tags that Node Wrangler looks for in image textures, which it uses to plug textures into the proper input of the Principled BSDF shader. Simply mimic the recording below to input your own custom PBR tag conventions:

Recommended PBR tags
We recommend the following tags for most conversion scenarios:
| Regexed Name | Recommended PBR Tags |
|---|---|
BaseColor |
albedo base col color basecolor diffuse diff |
Subsurface |
sss subsurface |
Metallic |
metallic metalness metal mtl |
Specular |
specularity specular spec spc |
Roughness |
roughness rough rgh |
Gloss |
gloss glossy glossiness |
Normal |
normal nor nrm nrml norm |
Bump |
bump bmp |
Displacement |
displacement displace disp dsp height heightmap |
Transmission |
transmission |
Emission |
emission emissive emit |
Alpha |
alpha opacity transparency |
Ambient_Occlusion |
ao ambient occlusion |
Keep Edited Textures#
Keep Edited Textures in order to have granular access to the images resulting from on-the-fly modifications.
Tip
This can be useful if you ever need to manually edit individual image textures later or want to troubleshoot textures that did not get assigned properly to your model(s).
Missing Something?
Do you think we're missing a feature? Submit a request on Github!